Jump to
Drive Practice Growth With Pre-Qualification
How to Start The Pre-Qualification Process
How Patients Complete the Pre-Qualification Process
Checking Pre-Qualification Status
Turning A Pre-Qualification Into A Funded Payment Plan
Finding Your Practice's Pre-Qualification Links
Locating your 4 Digit Text Code
Create a Unique Pre-Qualification Link with Your Practice Name
End-to-End Patient Experience Walkthrough
Drive Practice Growth With Pre-Qualification
Offering a simple pre-qualification option can make a big impact on how patients approach care—and how your practice grows. By giving patients financial clarity upfront, you help remove cost-related barriers that often delay treatment. It’s quick, has no impact on credit, and is easy to add to your workflow.
Check out our article on when and how to use Pre-Qualification so your practice can confidently use it to drive growth.
👉 How to Grow Your Practice with Pre-Qualification
How to Start The Pre-Qualification Process
There are several convenient ways to help your applicants get pre-qualified: patients can text your practice code to HFD, you can send the link directly to them, or you can bookmark a custom link on your in-office device.
1. Text to Pre-Qualify
Patients can simply text your unique code to 39308 to receive your practice’s Pre-Qual application. Need help finding your code? Click here.
2. Send Link Directly To The Applicant - Text or Email

-
From the dashboard in the Provider Portal, locate the Send Pre-Qualification Link card in the upper left.
- The card defaults to Text Link; a message is sent so the applicant can complete Pre-Qualification from their device.
- To send by email, select Email Link using the arrow. The applicant will complete Pre-Qualification from their device.
3. Bookmark
Bookmark your practice’s Pre-Qualification link on your in-office device so patients can easily complete the process right in your clinic. For step-by-step guidance on finding your practice links, click here.
👉 Check out our video on the full experience here.How Patients Complete the Pre-Qualification Process
Once you choose how the applicant will receive their pre-qualification link, they will have a few steps to complete in order to get pre-qualified.
- The applicant will click Get Started
- Next, they will enter their valid mobile phone number and click Next
- A text message will be sent to that device with a validation code, enter the code on Step 3 and click Next
- On Step 4 the applicant will enter their Full Name and click Next
- Then they will enter their Date of Birth and click Next
- Enter their valid Email Address and click Next
- Now, they will enter their Physical Address and click Next
- On the final step they will enter the last 4 of their SSN/ITIN and click Get Pre-Qualified
- If Pre-Qualified, a screen will appear with their pre-approval amount and a calculator to help them estimate their monthly payment.
All information entered here will be used in their final application if pre-qualified.
Checking Pre-Qualification Status
You can check the status of a pre-qualification request by going to the main dashboard on the Provider Portal. Here you will see two status columns that will indicate where the applicant is in the process and their status.
Lifecycle Stage |
Status |
|||
| Pre-Qual | Applicant has been pre-qualified, but has not yet moved forward with an application. | Pre-Qualified | Applicant has submitted pre-qualification and is eligible to move forward in the application process. | |
| Application | Applicant has selected their offer but has not completed their payment plan setup. |
Not Pre-Qualified |
Applicant has not been pre-qualified and no offers exist for this applicant. | |
| Payment Plan | Applicant has completed their payment plan setup and billing will begin. |
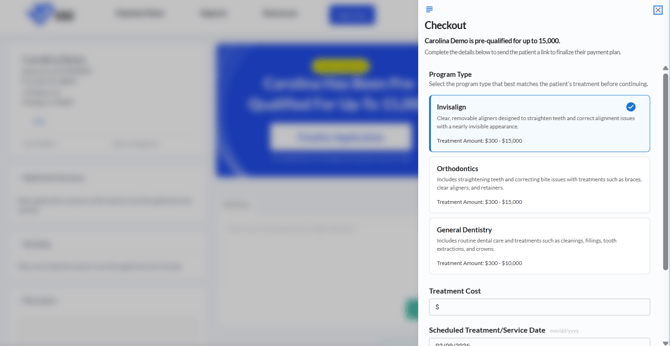
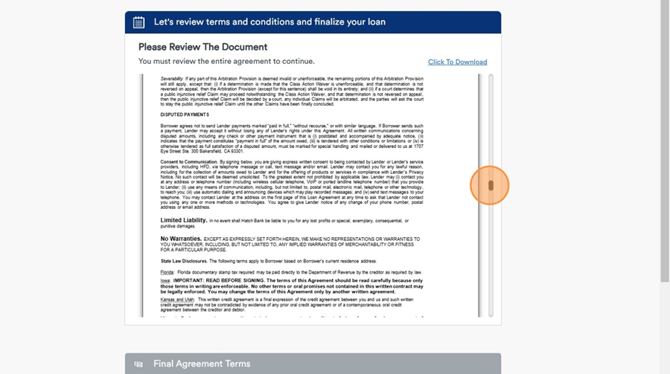
Turning A Pre-Qualification Into A Funded Payment Plan
Once an applicant is pre-qualified, there are a few additional steps needed to setup the payment plan.
-
Access the Provider Portal and find the applicant in the dashboard grid
- Select the HFD ID of the pre-qualification for that applicant
 |
 |
 |
 |
 |
 |
|

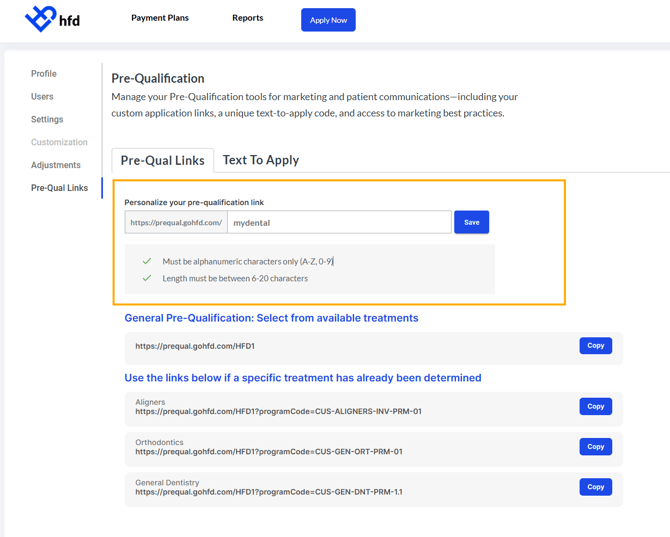
Finding Your Practice's Pre-Qualification Links and Text Code
Your Pre-Qual links are unique to your practice. To access your Pre-Qual links in the Provider Portal:
-
Click your profile icon in the top right corner and select Settings
-
On the Settings page, click Pre-Qual Links
✨Learn how to create your own custom branded pre-qual link here.
Which Pre-Qual Link to Use
If you don’t know the specific treatment a patient will receive (for example, if you're adding the link to your website), use the General Pre-Qual link at the top of the page.
If you do know the treatment type (like when sending the link after a consultation), use the Pre-Qual link that matches that service.
Using the right link ensures your patient sees the most relevant offers for their treatment.

Text to Pre-Qualify
Your text code is the 4-digit number found within your provider settings. Patients can text your code to 39308 to receive your practice's Pre-Qual application.
‼️This code is unique to your practice, it ensures applications are routed correctly and patients receive accurate info.
Locating Your Text Code
- In your provider Settings, go to the Pre-Qual Links and find the Text to Apply tab.
- Copy your Practice Code and add to your website along with the text in number.

Create a Unique Pre-Qualification Link with Your Practice Name
A custom URL that includes your practice name, location or a familiar phrase helps establish credibility and trust. By personalizing your link, you signal to patients that the URL is secure and specifically intended for your office, which enhances their confidence when accessing your financing services and beyond.
- In your provider Settings, go to the Pre-Qual Links and find the Pre-Qual Links tab.
- Enter your practice name/location or phrase in the blank field (back-half of the URL). It must be between 6-36 characters, all lowercase and without spaces.
- Click Save. All links will update.
⭐TIP: The more concise the back-half of your URL is, the easier for your customers to remember.
You can change the back-half of your URL once per day, with changes taking effect immediately. After an update, previously generated custom links will no longer work, so be sure to update any shared materials or communications with your new link.
👉Your HFD-assigned 4-digit text code link will always be active, even if you create a custom URL. Use the text code in printed materials, signage, or support references.
End-to-End Pre-Qualification Patient Experience Walkthrough
Get a full walkthrough of the patient Pre-Qualification experience, from start to finish. See how quick and easy it is, and how it helps patients feel more confident and ready for care.
👉 See our frequently asked pre-qualification questions here.